Using the mailFISH is really easy. This page describes how to set up the mailFISH and your favourite E-mail clients in order to be able to receive mails from behind any firewall or proxy.
On this page, it is described how to employ the mailFISH. In particular it is explained
how to set up your favourite E-mail client for use with the mailFISH POP3/SMTP proxy. Moreover,
the most important configuration possibilities are discussed.
In order to start receiving messages by use of the mailFISH please proceed as follows:
Start the mailFISH client application. On Microsoft Windows just double-click the generated
program shortcut. On other operating systems execute the JAR file by calling
java -jar mailFISH.jar
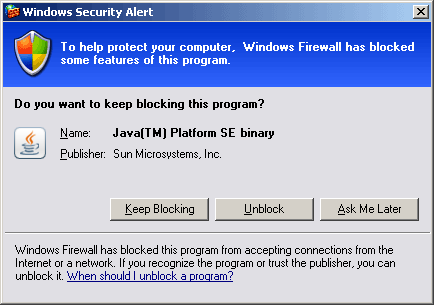
Allow the program to access the internet and to act as a server on ports 25 and 110. On
Microsoft Windows, for this purpose you have to click Unblock
in the appearing firewall security alert.
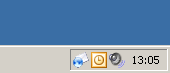
You now see either the mailFISH POP3/SMTP Proxy application window or a system tray icon:
You can switch between these two states by minimizing/closing the window and double-clicking
the tray icon. In both of these states the mailFISH client accepts mail connections.
Configure your E-Mail Client by updating the mail accounts you want
to associate with the mailFISH service:
Write down or remember your current mailbox settings as you will need them later.
Replace your existing POP3 server (e.g. pop.gmail.com)
with localhost or 127.0.0.1,
port 110, no SSL.
Replace your existing SMTP server (e.g. smtp.gmail.com)
with localhost or 127.0.0.1,
port 25, no SSL.
Enter your E-Mail address as the POP3 mailbox user name.
Leave your mailbox password unmodified.
If your SMTP server requires login, please make sure that the original SMTP
login information is entered in the respective fields.
We have prepared a screenshot tutorial which shows
how to apply the respective settings for a Gmail account in Microsoft Outlook 2003.
Try to send and receive messages by use of your E-Mail client.
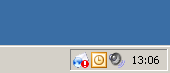
You are prompted by the mailFISH client to enter your original mailbox settings. This
is indicated by an exclamation mark next to the mailFISH tray icon.
Open the mailFISH application window to review and complete your previous POP3/SMTP
configuration (e.g. pop.gmail.com on port
995, smtp.gmail.com on port
465, etc.). Click Ok to confirm
your settings.
Try to send and receive messages by use of your E-Mail client again. Everything should
work as it did before. Except for the fact that you are now also able to use your favourite
E-Mail client behind any firewall and proxy. The mailFISH client shows status information
on your mail accounts and the associated credits as is depicted in the subsequent figure.
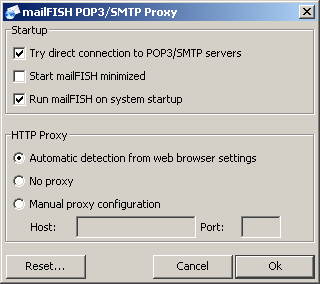
You can configure the behaviour of the mailFISH client by use of the application settings dialog.
In the Edit menu click Settings....
The settings dialog appears.
The following settings can be made:
Try direct connection to POP3/SMTP servers. Indicates
whether or not the mailFISH client shall try to directly connect to your mail servers.
If the respective checkbox is disabled, all your mail communication goes through
www.serFISH.com. Default: enabled.
Start mailFISH minimized. If this checkbox is activated,
the mailFISH client is started minimized. Accordingly it is only shown in the system
tray on application startup. Default: disabled.
Run mailFISH on system startup. This Windows-specific
setting defines whether the mailFISH is executed automatically on system startup. As
your E-Mail clients will only receive messages when the mailFISH client is running, it
is strongly recommended to have the respective checkbox enabled. Default: enabled.
HTTP Proxy. You can choose between automatic detection,
no proxy or manual configuration. The latter requires the provision of a proxy server
name or port. Default: Automatic detection.